Because MasterPlan will use some of the client's personal information during projections into the future, it is important that you know the significance of these items.
We will not duplicate here all the information that is available in the Message Center and when you press the F1 Help key, but we will highlight some of the items.
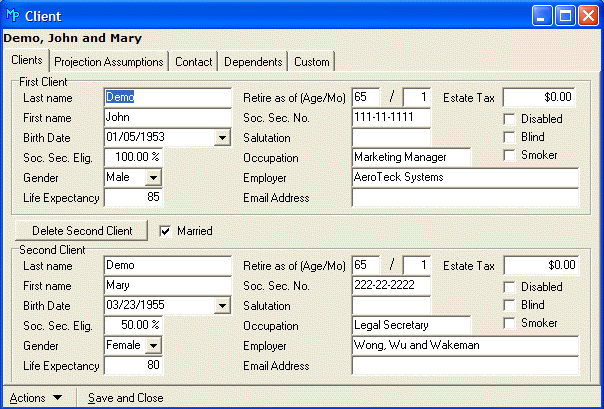
On this tab we have provided data entry fields for the First Client and for the Second Client (optional). Many planners enter the oldest client as the first client.
We have arranged the data entry fields so that the most important information is on the left-hand column. In fact, for each client, this information is vital.
Tip: In fact, you should never blank out something that MasterPlan has filled out as a default. If you don't know the answer, just leave the default value.
Notice that the clients can have different last names. If they are married, you can check the Married checkbox, but this will not have any effect on the reports.
If a client changes the last name, due to marriage or other reason, you can enter the change to the Last Name data item. You do NOT have to delete the client record and reenter all the rest of the client's information. The client's asset and liability information will remain intact and accessible.
MasterPlan will sort the client list by the Household Name on the Projection Assumptions Tab. Change it there if you want to change the order of this client in the list of clients.
These are used to calculate the ages of the First and Second Clients, as of the Projection Date on the Projection Assumptions Tab.
Since MasterPlan projects the client's situation to life expectancy (to a maximum of 99 years), these are very important items, and must be entered correctly.
A client's birthday cannot be the current date. For example, if you have a client that is actually 65, but you have left their birthday set to the current date, MasterPlan cannot make sense out of the other data you have entered.
MasterPlan will cut off all earned income (i.e., salary and self-employment income) at the retirement ages you specify. It will also cut off life insurance premiums and ongoing contributions to all investments at retirement.
MasterPlan will also use the retirement ages in determining when to start Social Security benefits, if you have indicated the client and/or second client is eligible.
If the retirement age is 62 or below, Social Security benefits will begin at age 62, but MasterPlan will discount the benefit amount as required. If the retirement age is over 65, then Social Security benefits will begin at the age you specify as the retirement age. For younger clients, the maximum retirement age slides up beyond 65.
You should enter the percentage of maximum benefits you expect your clients to receive at retirement. Entering 100 tells MasterPlan your clients will receive 100% of the maximum benefit at the time they retire. However, very few people are eligible for 100% benefits.
Note: Even if both the client and second client are 100% eligible, each person will not receive the maximum benefits because there is a family maximum.
Calculating FICA and Medicare Taxes: Any percentage of 1 or greater than 1 (i.e. 1% of the maximum benefit) tells MasterPlan to calculate and withhold the appropriate Social Security taxes from salary and/or self-employment income.
Calculating Social Security Benefits: Any percentage greater than 1% tells MasterPlan to calculate the Social Security benefits your clients should receive, beginning at the appropriate age as discussed above. MasterPlan uses the percentage entered here to determine the percentage of eligibility. If the retirement age is 62 or below, MasterPlan will lower the calculated benefit due to the early payment of benefits.
In other words, if you enter a 1 for the Social Security eligibility, this tells MasterPlan that it should calculate and withhold the Social Security tax from salary and self-employment income, but NOT calculate any benefits at retirement.
Entering a 0 for the eligibility tells MasterPlan NOT to withhold the Social Security tax and NOT to calculate any benefits at retirement.
Entering a percentage such as 75% tells MasterPlan to calculate the benefit at 75% of the maximum benefit if the person retires at the age when they can receive their maximum. MasterPlan discounts this figure if they retire earlier.
To summarize:
Any number greater than 1 = Social Security Tax AND Benefits at retirement
1 = Social Security Tax but NO Benefits
0 = NO Social Security Tax and NO Benefits
If your clients are already retired, enter 0 for eligibility, and be sure to enter the Social Security income in the Tax and Cash Flow Form.
If your clients will retire fairly soon, you can probably be more accurate in determining the benefits than can MasterPlan. In this case, enter 1 (to have the tax withheld but no benefits automatically calculated) and enter your estimate of Social Security income in the Tax and Cash Flow Form.
When you create a new client, MasterPlan fills out much of the information on this tab from the preferences that you have selected on the Database | Preferences | Economic Assumptions and Client Defaults Tabs. Any changes that you make here will be saved with this particular client and will not affect the original Preferences.
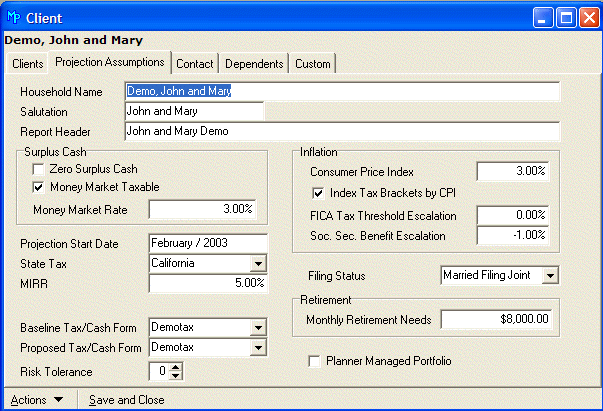
Very Important: On this tab you tell MasterPlan which Tax and Cash Flow Forms to use when creating the reports.
For more information on this important form, please refer to the Tax and Cash Flow Form Data Entry Steps section.
You can create as many Tax and Cash Flow Forms as you wish for any client. However, you must tell MasterPlan which of these forms to use for the Baseline Present Scenario reports and which to use for the Proposed What-If Scenario reports.
If you don't select a Tax and Cash Flow Form on this tab, MasterPlan uses the Default form (which contains no information other than a filing status of 2—married).
You can easily tell which form MasterPlan expects to use. As soon as you select a client from the client list, we display include the name of the form for the baseline present situation on the Status Line after B: and the one for the proposed what-if situation after P:
If you have just started to create a new client and you have not yet saved this client on the database, do so now by clicking on Actions | Save or by pressing Ctrl+S. Now you can attach multiple items such as addresses and phone numbers for this client.

After you save the client on the database, you can enter the following addresses:
Home
Business 1
Business 2
Other
Internet
To enter one of these addresses, click on the appropriate button. For example, to enter the first Business address, click in the button beside Business 1 and begin typing.
The address fields are constructed as follows:
Type the first line of the address on the first line
Type the second line of the address (if there is one) on the second line
Type the City on the third line
Select the State from the drop-down list. Be sure to type in the zip code on the fourth line
Note: The Balance Sheet includes the client's home address at the top of the report. If you do not want to include the address, you can edit the template file to eliminate this information.
Click on the Add Button.

Type the phone number.
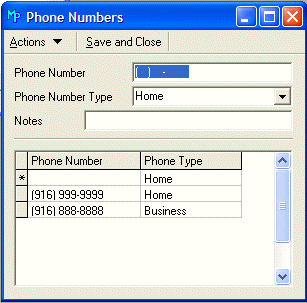
Then select the type of phone number from the drop-down menu.

If you want to type in a comment, enter it in the Notes field. Then click on the Save and Close Button.
Like the name implies, the notepad is just that--a place to jot down notes while you are working in MasterPlan. You may wish to make notes on the client's objectives and investment preferences, make extended comments on a particular asset, or make notes on the client's other financial advisors.
You can even use the notepad to create text that you will add to the client's financial plan.
MasterPlan maintains one notepad for each client.
You can access the notepad by clicking on Client | Edit Client | Contact Tab. Right-click in the notepad area to activate the edit menu.
Or, you can click on Notepad in the Main Toolbar. This view of the Notepad includes the edit buttons in the Notepad's Toolbar.
Click on Database | Administration | Setup Planner to create the string of date and time stamp codes that you want MasterPlan to automatically enter in the Notepad when you press Ctrl+T.
For example, if you select Date from that list, we will drop in today's date if you press Ctrl+T when entering a note.
